Overview
The GetintheLoop Customer Portal is the web-based tool for managing Properties and Integrations. As an Integration Customer, it allows you to:
- Manage the offers, businesses and collections for your products
- Create and manage mobile app and web integrations
- Grant team members access to these management features
Getting Started
Setting Up Your Property
Each Property is created by the GetintheLoop team once an integration agreement is in-place.
You will be notified that your Property is ready after it has been created. Once notified, you can proceed to https://portal.loopmediagroup.com and sign in.
Invite Teammates
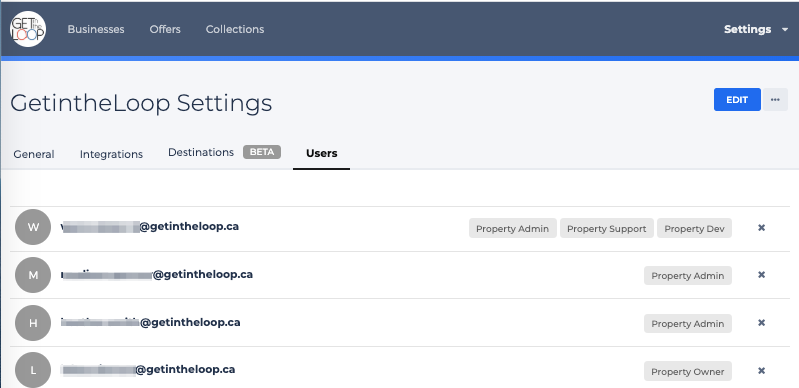
Add co-workers to your Property in Property Settings > Users. Property users are able to see all the businesses, offers, and audience data in the Property.
Just add their email address and chose their role and permissions, then click Invite to send them an invite email.
You can also change an existing user's role, or remove a user from the same location.
Property Roles
Property Owner(all permissions – inc. delete property – ie. super admin)Property Admin(all permissions)Property Dev(can see everything, edit & change property & integration settings)Property Marketing(read only for businesses / offers, ability to create collections, audience segments. etc)Property Support(read only ability to see offers, stats, reports, not change things)
Just add their email address and chose their role, then click Invite to send them an invite email.
Add Your First Integration
Each app or client that uses the offers, businesses, and audience data in your property requires a separate Integration. Integrations connect your product to the Platform via a Client SDK.
Create an New Integration Key
To create a new Integration:
- In the Property Settings > Integrations section, click the + Add Integration link at the bottom of the page.
- Select which SDK you'll be connecting to this integration (iOS / Android / Web), and add a name, and click Continue. The name is what you'll internally refer to this integration as.
- Save the Write Key that is shown for later. This is what is used to initialize the SDK in your app or product.
Proceed to install the Client SDK in your product:
Managing Your Property
Overview
To list offers in your Property, you need to:
- Enable a Business and some or all of that Business' Locations
- Create the first Offer for that Business
- Create a Collection that makes the Business or Offer discoverable via the SDK.
Adding Businesses and Offers
A Business is a single brand that can have zero or more physical locations. Enabling a business in your Property allows it to be discoverable and allows offers at that business to be published to your Apps and Integrations.
The GetintheLoop Platform provides a global list of many businesses and locations that you can select from automatically. It also provides the ability to add local businesses that are unique to your industry or market segment.
Step 1: Find and Enable a Business
Navigate to the Businesses tab in your Property and click the Add Business button at the top. Search to find the business you want to add by name or address.
Once you've found the right business, you can select which of the locations you want to enable. You can always change this later.
"Can't find the right business or location?" Just click the Can't Find ... links to add the missing entry, or request an update from our team.
Step 2: Creating an Offer
From a Business details page, click the Create Offer button to start. There is a simple process to add a new offer.
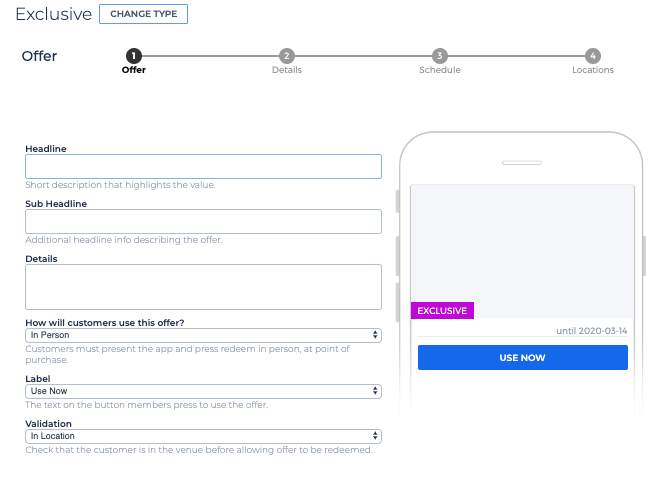
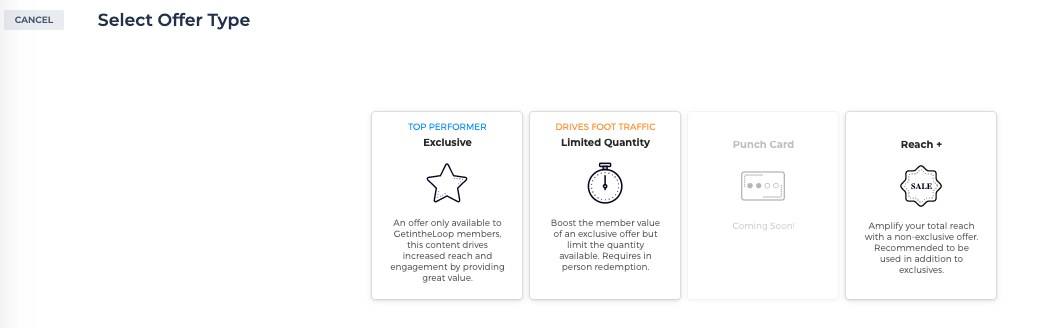
- Select the type of offer based on the requirements of the campaign
- Add a great headline that clearly highlights the value, details on the particular offer, and any optional terms or promo code.
- Add a great image that best shows the product or service being offered.
- Set the schedule when the offer is visible and usable. These can be different (ie. an offer that is always visible, but can only be used on certain days)
- Set how the offer will be used (in person, online, or by phone), and set any per-person limits the offer has
Finally, review the offer looks correct in the preview area, and click Publish.
Offer Types
It's important to select the right type of offer based on your business goal.
Exclusive will increase reach and actions. These offers are created specifically to be showcased on the platform and nowhere else.
Limited Quantity will drive foot traffic. These offers exist for a short amount of time, either because they have an expiry date or because there are only a certain amount available to be redeemed. Limited offers must be redeemed in person.
Punch Card offers are for generating long-term customer retention and rewarding loyalty.
Reach+ will amplify your brand awareness and reach. These non-exclusive offers have the lowest priority when it comes to sorting.
Advanced Settings
Featured Offer Offers that are tagged as Featured have a higher priority than other offers of that business, and subsequently are moved to the top of the offers list. Internal use only and used very sparingly.
Regions - There are 2 types of regions:
Discoverable Regions - allow for business to spread the reach of their offer to locations where their offer is not located. This is useful for travel or vacation offers where a business would want to advertise someone coming to them.
Redeemable Regions - allow for business to choose where the offer can be redeemed. It might be redeemed in the same discoverable region or the user might need to come to the offer location to redeem it.
Additional Search Keywords - for extra keywords that should surface this offer but aren't part of the offer copy.
Slug - a unique identifier offer URL is automatically generated when the offer is saved. However, you can create a unique identifier for the offer URL. This identifier must be unique otherwise the system will auto-generate an add-on number to the input.
Finally, review the offer looks correct in the preview area, and click Save as Draft or Publish.
Step 3: Creating a Collection
Collections are a general mechanism to group businesses and offers together.
Each SDK provides ways to search for specific collections, and to display the Businesses and Offers of an individual collection.
To start with, create simple collection to show the business you added above:
- In the Collections tab, click Add Collection
- Name the collection and add or select an image and icon for it. These are used by the SDK to show the collection in lists, and as a header image for collection list views.
- Click Create to save this collection.
For more details, see Collections.
Advanced Topics
Geographic Visibility Restrictions
Both Offers and Collections can have arbitrary geographic limits placed on them. This enables the offer or collection to be targeted to specific geographic areas only. In both cases, additional geographic restrictions can be added by adding locations to the Regions of the offer or collection.
Regions are pre-defined geographic areas that come from the GetintheLoop Platform GIS system. Virtually all neighbourhoods, cities, regional districts, states / provinces, and countries are available to use.
Managing Additional Locations
Many Businesses have more than one location. Each location must be enabled in each property. To enable or disable additional locations:
- Navigate to the business and select the Locations tab.
- Find the location in either the list or map views and click the Enable.
Can't Find The Right Location? Just click the Can't Find The Right Location? link to email a request to our team.
To Disable a location, view the details of the location and click the Disable Location button.